
How to clean your atomizers and resistors
A clean vaporizer is the easiest way to get optimal performance.
Although the ingredients in the liquid generally won’t stain your kit, residue will build up and build-up will eventually affect the performance of you vape. Vegetable glycerin and some darker liquid flavorings are known to ruin strengths, as are most of the sweeteners used in making liquids. A saturated coil will have less flavor and vapor production and will make vaping taste burnt.
Even if you change the resistance, the taste of your last liquid may still remain on your device.
This is especially true for tobacco, coffee, menthol, cinnamon, and other dominant flavors like melon, grape, or licorice. Imagine trying to vape a grape flavored coffee liquid, no offense to grape coffee lovers.
What if your vaper is new?
Sometimes atomizers and tanks arrive smelling of machine oil. They may not look dirty, but the distinctive smell will give them away. Whether your device is new or heavily used, proper cleaning is an easy way to ensure the best possible experience. Fortunately, most tanks these days are easy to clean if you know the correct steps to take.
Cleaning your atomizer
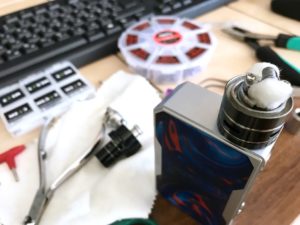
vape parts
Step One: Take out the resistor (we’ll discuss the resistor cleaning later). And while you’re at it, take the rest of the tank apart. Pay close attention to how things fit together and make a mental note of what is going and where. Keep everything organized and don’t lose any pieces. You can use a small bowl to store everything while you do this. This will make cleaning much more efficient, while also familiarizing yourself with the elements in your tank. There are many ways to clean your vaporizer tank, but these are the most effective.
Standard cleaning
If your tank is relatively clean, warm water works well. Disassemble the tank, separating the parts. Place each part under running water and pat dry with a paper towel. Let them air dry afterwards until no water or condensation is visible.
Take one and fill it with water. Put it in the microwave for about two minutes. Meanwhile, rinse the parts of your tank under the sink to begin the process. Then, take the mug or bowl out of the microwave and place your disassembled tank inside it.
Let it sit, until the water cools, then rinse the tank one last time under the sink. Use a paper towel to gently and carefully dry your tank. Set it aside until completely dry. You can also use a hair dryer to speed up the process, but too much heat can damage your O-rings.
The intense cleaning
If you want even better results, you can use a few simple household items to give your tank a deeper clean. Be careful to rinse them well after application and let your tank dry.
The sodium bicarbonate is a good cleaning agent that can be used for tanks shine again.
The ethanol, also known as grain alcohol, is another very effective substance for cleaning. Don’t confuse this with rubbing alcohol, which shouldn’t be used inside your tank.
The vinegar is very acidic cleaning agent, but should be rinsed well to prevent further smell.
The vodka cheap is not a household item, but you ‘ll probably find it in the supermarket. It will get the job done and it won’t cost you much.
Some vapers prefer to use a little dish soap or lemon juice with water. Again, remember to rinse well, as vaping dish soap is probably worse than it sounds.
Ultrasonic cleaning
If you want the most thorough cleaning possible for your vaporizer tanks, you will need an ultrasonic cleaner. Typically used to clean jewelry and precious metals, it is now used by vapers around the world to clean their atomizers. While you don’t need an ultrasonic cleaner made specifically for vaping equipment, having one that can run for cycles longer than ten minutes will help.
Using an ultrasonic cleaner is not a complicated process. Just fill it with water and use it until you clean the vaporizer tank parts. For best results, you can add a couple of drops of dishwashing liquid to your ultrasonic cleaner. Then you rinse the tank more and let it dry.
Cleaning the resistors
Heating element cleaning is a bit less straightforward. There are two types of heating elements: conventional tank heating elements, which are enclosed in a small metal chamber containing absorbent cotton; and serviceable resistors, which require the user to install and assemble them. The approach to cleaning the two types is very different.
Conventional resistors
Conventional resistors that come with sub ohm tanks and clearomizers can be technically cleaned, but will not fully reactivate. At best, you get a few more days of conventional resistance. The reason behind that is the presence of cotton. Allowing dirty coils to soak and allow water to pass through will remove some of the residue, but not all. And on top of that, you’ll have to wait for the water to completely evaporate, which can take a while.
- If you still want to clean the coil heads, you can follow the old soak and rinse method.
- Let your resistance soak in cheap ethanol, vinegar, or vodka for at least a couple of hours
- Place it under the tap and rinse.
- Rinse once more with a little distilled water.
- Blow air into the open side of your coil to force the water out
- Let it dry until all the water has evaporated.
A little sun or a heater will speed up the process, but it will still take time. You’ll notice that the cottons will look a lot better after that, but again, don’t get too hopeful. You will still need to change the resistor soon despite how new it will look.
Repairable resistors
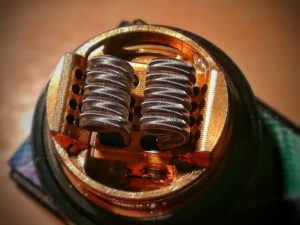
vape coil
If you are using a repairable atomizer, you can not only clean your coils, but you actually have to clean them! The armored heating elements will begin to suffer rapidly in flavor and vapor production. But you can follow a few simple steps and have your resistors almost as good as new in no time.
The first thing you have to do is remove the cottons from your heating elements, you don’t want to burn them. If your resistances are not that bad, a slight “dry burn” will suffice. Press the fire button a few times until the remaining liquid is removed, let them cool, and reassemble.
But if you’ve already done it a couple of times, dry burning may not be the trick. In that case, you can follow these steps for a more thorough cleaning.
- Remove the cotton
- Dry burn your heating elements lightly (don’t let them shine too bright)
- Remove the atomizer from your mod
- Place it under running water
- Brush them lightly with a toothbrush or resistor cleaning tool
- Rinse one more time
- Finish with a last dry burn to remove the last drops of water.
You can also use a little dishwashing liquid when brushing your heating elements, but be careful to rinse them well afterwards with hot water.
If your coils are still very dirty, or if flavor production has dropped significantly, then it is time to reset your atomizer. Proper cleaning will greatly extend the life of your resistors, but at some point, they will succumb to time and extensive use.
Ultrasonic cleaning
If you want the most thorough cleaning possible for your vaporizer tanks, you will need an ultrasonic cleaner. Typically used to clean jewelry and precious metals, it is now used by vapers around the world to clean their atomizers. While you don’t need an ultrasonic cleaner made specifically for vaping equipment, having one that can run for cycles longer than ten minutes will help.
Using an ultrasonic cleaner is not a complicated process. Just fill it with water and use it until you clean the vaporizer tank parts. For best results, you can add a couple of drops of dishwashing liquid to your ultrasonic cleaner. Then you rinse the tank more and let it dry.
Cleaning the resistors
Heating element cleaning is a bit less straightforward. There are two types of heating elements: conventional tank heating elements, which are enclosed in a small metal chamber containing absorbent cotton; and serviceable resistors, which require the user to install and assemble them. The approach to cleaning the two types is very different.
Conventional resistors
vape coil 2
Conventional resistors that come with sub ohm tanks and clearomizers can be technically cleaned, but will not fully reactivate. At best, you get a few more days of conventional resistance. The reason behind that is the presence of cotton.
Allowing dirty coils to soak and allow water to pass through will remove some of the residue, but not all. And on top of that, you’ll have to wait for the water to completely evaporate, which can take a while.
- If you still want to clean the coil heads, you can follow the old soak and rinse method.
- Let your resistance soak in cheap ethanol, vinegar, or vodka for at least a couple of hours
- Place it under the tap and rinse.
- Rinse once more with a little distilled water.
- Blow air into the open side of your coil to force the water out
- Let it dry until all the water has evaporated.
A little sun or a heater will speed up the process, but it will still take time. You’ll notice that the cottons will look a lot better after that, but again, don’t get too hopeful. You will still need to change the resistor soon despite how new it will look.
Repairable resistors
If you are using a repairable atomizer, you can not only clean your coils, but you actually have to clean them! The armored heating elements will begin to suffer rapidly in flavor and vapor production. But you can follow a few simple steps and have your resistors almost as good as new in no time.
The first thing you have to do is remove the cottons from your heating elements, you don’t want to burn them. If your resistances are not that bad, a slight “dry burn” will suffice. Press the fire button a few times until the remaining liquid is removed, let them cool, and reassemble.
But if you’ve already done it a couple of times, dry burning may not be the trick. In that case, you can follow these steps for a more thorough cleaning.
- Remove the cotton
- Dry burn your heating elements lightly (don’t let them shine too bright)
- Remove the atomizer from your mod
- Place it under running water
- Brush them lightly with a toothbrush or resistor cleaning tool
- Rinse one more time
- Finish with a last dry burn to remove the last drops of water.
You can also use a little dishwashing liquid when brushing your heating elements, but be careful to rinse them well afterwards with hot water.
If your coils are still very dirty, or if flavor production has dropped significantly, then it is time to reset your atomizer. Proper cleaning will greatly extend the life of your resistors, but at some point, they will succumb to time and extensive use.