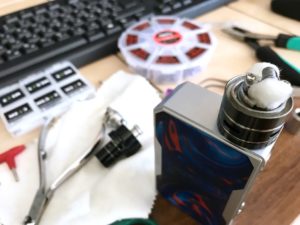
The Vape Pen is a great tool to use if you are trying to learn how to load your own Vape Pen with Wax.
I don’t recommend using any other brand of wax for your pen, as you will experience a lot more mess and damage if you do. Most people don’t care about their equipment and think that it is a cheap device to replace when something goes wrong, but trust me when I have been in your shoes you want to protect your investment. So how do you load your own Vape Pen with Wax?
You must have seen pictures of a person loading their own Vape Pen with Wax.
how to use a vape pen
The first step is to use a small amount of safe and nontoxic wax. Make sure that the wax has been approved by your local health department before proceeding. If you can find one that is made specifically for your type of electronic device, then go for it! This small amount will provide enough heat to melt the wax and unclog your airflow system. It is important to remember to only heat the small amount of wax.
Once the coil is heated up, grab your load tool and load it up into the coil.
dyi vape juice
The load tool should look similar to a hook (it probably does). Once loaded into the coil, you should see a small amount of black smoke start to emit from the coil. If there is no black smoke coming from the coil, something may be wrong. Check to see if there is a small amount of melted wax in the coil and if not, the load tool may need to be adjusted.
If your coil is clean, and the black smoke still does not appear, then your coil is too dirty or damaged to use. Cleaning your coil does not include burning the wick. Just switch it off and allow it to cool down for a couple of hours or even overnight. After it has cooled down, you can then proceed to use the pressurized air supply.
Using the pressurized air supply to load your vaporizer is pretty simple.
Simply place your pen in the coil and start clicking and whirring away. When the coil begins to catch air, you know your coil is clean. You can then load more wick into the coil and continue clicking and whirring away.
If you find that your coil is too dirty, then you may have to remove some of the wick. Use a screwdriver to pry out a small amount of dirt, and then insert the end of the wick again into the coil. Repeat this process until your coil is free of dust and anything else that may impede your ability to use the device. You don’t want to damage your machine, so take your time with this step.
In conclusion, this article was designed to help you understand how to load your vaporizer with WAX. If you follow the tips here, you will find that your pen will be more reliable when properly warmed up. Also, you will find that loading and enjoying your pen will be much more enjoyable. So now that you know how, just go ahead and try it out.
https://liftvaporblog.com/wp-content/uploads/sites/13/2020/12/pckt-one-plus.jpg5005002020-12-14 08:55:502020-12-14 08:55:50How To Load Your Vaporizer With Wax
A dry herb vaporizer or simply a weed vaporizer is a smoking device that is used to vaporize dried medicinal herbs, tobacco, or any other legal herb form into a fine mist.
This provides you the same benefits of enjoying dried herbs without inhaling toxic smoke. However, some people don’t realize how to use a dry herb vaporizer.
In this article we are going to explain how to use a dry herb vaporizer the right way.
First we are going to look at how to light a dry herb vaporizer. When you first purchase your weed vaporizer you should find the instructional manual and fill the system with the herbs you want to use.
Some brands of vaporizers have the herbs pre-loaded, which makes the process of loading the machine a lot easier. Simply add the herbs to the mouthpiece and screw on the mouthpiece tightly. Most vaporizers have a safety indicator located on the bottom of the unit which will stop your herbs from burning.
Next, you need to load your herbs into the mouthpiece.
Most vaporizers have a bottom heating chamber where you load the herbs and place them in the mouthpiece. If your mouthpiece doesn’t have a heating chamber, then insert your finger into the mouthpiece and push air down through the tube. Once you feel air moving, you can load your herbs into the mouthpiece.
After your herbs are loaded into the chamber, you need to make sure you clean out the mouthpiece. The cleaning process is very simple. You just need to remove the mouthpiece and clean the inside of the chamber with a q-tip or tissue to remove any excess oil or water. Replace the mouthpiece back onto your vaporizer and you are ready to start using it.
Now, we will focus on the second part of the question, how to use the weed vaporizer?
In order to get maximum flavor from your weed vaporizer, you should always have fresh herbs on hand. For the most flavorful experience, you should have a glass jar with some fresh herbs in it. When you glass jar gets dirty, simply take some of the herbs out of the jar and place them into the vaporizer.
Then, you should fill the mouthpiece with hot air. If you use the right amount of water, the herbs will condense into mist and float away into the bowl of the vaporizer. As the temperature of the heating chamber rises, you should take the air out of the heating chamber and place it into your vaporizer’s hopper. This will allow you to have more control over the airflow of your dry herbs.
You can now put your fingers close together over the mouthpiece and inhale the steam inhalation.
As your herbs reach the boiling point, you should take a deep breath, and the oils will escape into your lungs.
The combination of the heat from the heating chamber and the steam inhalation will create a very potent herbic experience!
If you want to maximize your experience, keep fresh herbs on hand. Also, if you want a really potent herb experience, consider purchasing one of the many portable vapes that are available on the market today. These vaporizers are easier to use than ever before and provide an excellent high for the times you choose to medicate without the mess of a full blown vaporizer.
https://liftvaporblog.com/wp-content/uploads/sites/13/2020/12/1.jpg192010802020-12-14 08:46:512020-12-14 08:46:51How to Use Dry Herb Vaporizers?
There are many different portable vaporizers on the market. Some of them have a lot of hype behind them, while others seem to be just another vaporizer with some clever marketing.
When you’re trying to find the best portable vaporizer for your needs, however, there are a few features that you should look for in a vaporizer. T
hese include a portability factor, price, and portability factor plus two extra bonuses.
One of the best portable vaporizers for the budget-conscious consumer is the vaporizer that uses Firefly 2, the best portable vaporizer on the market today.
Firefly 2
With its advanced dual-thermal convection heat system, the Firefly 2 vaporizer heats up your bowl, while at the same time cooling your mouthpiece so that your entire hand can become comfortable. This allows for a smoother experience as the entire hand becomes one source of heat and not just a fire.
It also eliminates the burning sensation that so many people suffer from when using their devices. The Vaporizer II has a reusable water chamber that allows for the best possible waterless experience when using it.
If you are looking for something with a little more high tech, then there are many different vaporizers available.
There are many different types of portable humidifiers, vaporizers, and flavored inhalers available. All of these options make it easy to find the right vaporizer for you and your budget.
The best Vaporizer I found in 2020, that had all of this was the Airvape Legacy.
Airvape Legacy
The Airvape Legacy had a portability factor that the other portable vaporizers did not have. It was extremely lightweight and it held onto a tabletop that was stable enough to use. There were some new to the vaporizers come in waterless functions.
One of the best features of the vaporizer that I found was the temperature control.
The vaporizer that I purchased had a display that displayed the Fahrenheit of what I was cooking at the time that I was smoking. The vaporizer that I purchased even offered a backup button that let me know if the unit had finished heating when I did not need it to. Many of the portable vaporizers come with a stand-alone vaporizer, and the vaporizer included in the vaporizer kit that I bought worked well with my stand-alone vaporizer.
One of the vaporizer’s main competitors is the Thermax Waterless.
The vaporizer that I chose was a part of a larger set of vaporizers that included two other devices. The vaporizer that I chose did not compare to the vaporizer that the
Thermax Waterless offers, but it did better than the average portable vaporizer. When I looked at the features of the vaporizer that I purchased, I decided that I like the easy-clean design. I also liked the temperature gauge better than the Thermax.
The vaporizer that I chose may not be the vaporizer of choice for everyone.
There are so many different vaporizers available on the market today that one can easily become overwhelmed. But for me, it was a simple decision.
The Best Portable Vaporizer 2021 got my seal of approval.
If you have made the decision that you want to purchase a vaporizer then there are so many different vaporizers available on the market today that you can become confused about which one is right for you. I would recommend that you review my review above for more information on the vaporizer that I purchased. You can find out more about my review by following the link below. I wish you luck in your search for the best portable vaporizers available on the market today!
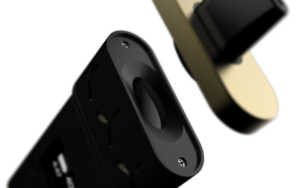
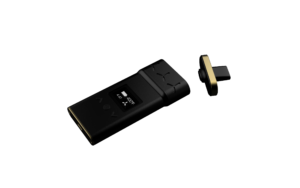
https://liftvaporblog.com/wp-content/uploads/sites/13/2020/12/e-cigarettes_t20_nen2eK-1.jpg67510122020-12-14 08:39:582020-12-14 08:39:58The Best Portable Vaporizer For the Price
Why Vaping Wax Is A Better Alternative Than Smoking
When you hear the term “dabbing”, do you think it means what it actually does?
Some people are confused when they hear this word. It is actually slang for “consuming”.
But if you really want to get technical, dabbing tobacco is a wider term than just vaporizing tobacco.
When someone tells you that they’re dabbing dabs, it can mean that they’re using a nail grinder, a dabs holder, a dab kit, or even a vaporizer pen.
There are many different kits available for home and commercial use. These include dabs towers, nail grinder tools, and nail grinders. Basically any grinder with a hot plate or some sort of heating element to cook the wax is included in a kit.
Now, you don’t need a professional kit to make a wax rig.
The only really necessary tool is an electronic nail torch. This is a small hand held device that looks a little like a firework toy. It’s powered by batteries but has enough power to melt wax and even burn through insulation. These are usually used by professional vapers as a way to get consistent results.
You can also purchase concentrates instead of purchasing a kit.
Although some concentrate kits include all of the necessary parts, many concentrate kits only include the wax and some wax additives to raise the concentration of waxes in your mixture. Concentrates are usually heated up in their own little container to reach the right boiling point. They may have different instructions for use than traditional waxes. Once the temperature has reached the proper concentration, then they’re ready to use.
All Of These Tools Are Necessary To Use A Conduction Smoker: Most vaporizers are set up with metal coils that heat up when the candle wax is in direct heat.
When the temperature is reached, the metal coils heat up and conduction to take place. The wax vaporizers are similar to concentrate kits in that there is a heating element but the concentrate is in a separate container and is never heated up by the conduction process. As the hot wax vaporizes, it cools and the concentrated flavor or scent is dispersed into the air.
What To Look For In A Good Way Vaporizer: The best wax vaporizer should have a clean design and good ventilation.
The heating chamber and fan should be clear so that you can see when the wick is smoking. It should be made from stainless steel that will not get rusted easily. The fan should be able to regulate the air flow. You should be able to adjust the air flow and speed to suit your personal preference.
Where To Buy Them: There are numerous places that you can buy these gadgets.
The easiest place to shop for a good vaporizer is your local drugstore. You can find many different types of vapes in their wax section. If you want one that is portable, then you might want to try a battery operated one that is called a Pax. If you are looking for a larger device, then the best choice for you is an electric pen vaporizer. Either way, you should always try to buy your vapes from a reliable online vendor.
Choosing Your Mouthpiece:
When you have found the perfect device, you need to choose the right mouthpiece to go with it. There are two types of mouthpieces: plastic and ceramic. The plastic type is more affordable and the ceramic type is more durable and can take a beating.
How To Use Them:
Vaping cannabis is completely different than smoking it. In order to get your cannabis products steamed and ready to consume, you need to use a vaporizer. There are two different types of vaporizers. One is the concentrate only and the other is the tankless variety. Both work the same way, but the concentrate only is easier to use.
How To Use The Accessories:
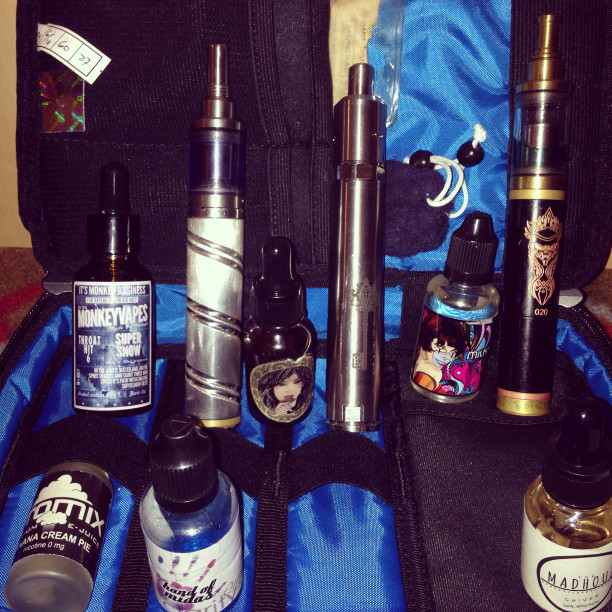
Vaping kits
There are many accessories that go along with the use of a vaporizer. You can use these to customize your equipment. For instance, there are grinders that are used to make your cannabis grind into a fine powder. You can also use these to easily grind your cannabis into a fine dust.
The bottom line is that vaporizers are a great way to consume pure, concentrated cannabis without ingesting any harmful smoke or toxins. They are easy to use and the vapor they produce is much better than exhaling smoke from a cigarette. They allow you to enjoy your favourite flavours without worrying about damaging the lungs by inhaling too much steam. Many people enjoy combining their wax vaporizers with other accessories such as a mouthpiece. This combination allows you to enjoy the ultimate in personal comfort.
https://liftvaporblog.com/wp-content/uploads/sites/13/2020/12/RKeEPD_t20_3420l9.jpg6126122020-12-14 08:32:442020-12-14 08:32:44Why Vaping Wax Is A Better Than Smoking
The 9 reasons to Vaporize are many, and you should be able to find a use for it that satisfies each one of them. The electronic cigarette is an awesome device that has really just taken off, and the Vaporizers are making it much easier to share the awesome benefits of this new addiction with friends and family.
They’re much more affordable than smoking cigarettes, and that alone is a huge benefit. You can pack a powerful flavorful draw into an e-pipe with only pennies per day compared to tens of hundreds of dollars per pack of cigarettes. It’s much less dangerous than nicotine, and that’s a big reason to get a vaporizer.
Here are another 9 reasons to vaporize.
The two main methods of ingestion include
(1) the use of a vaporizer, or
(2) the inhalation of a dry herb vaporizer.
The vaporizer eliminates the need for oral smoking, which is both bad for your mouth and bad for your lungs.
The herb doesn’t go through the same damage as the tobacco leaf does. With the right dry herb vaporizer you can inhale fresh herbs without going to all that trouble of smoking another cigarette.
Why not use a vaporizer while riding a motorcycle?
If you take it out on the road, no one needs to know that you are smoking. You can carry it in your pocket or wear it on your belt to make it easy to vaporize in any situation. You can’t use a real pen on a bike, but you can use a vaporizer there. It’s a great idea for when you travel and want to avoid smelling smoke.
A lot of people who have a sweet tooth like to indulge in dark chocolate and other rich flavored gourmet desserts at dinner. If you use a dry herb vaporizer while baking your dessert, you won’t have to worry about getting “high” from eating too much chocolate or another sugary treat. Your vaporizer will keep you from overindulging. Even if you don’t feel like indulging, it’s good to know that you can still enjoy a dessert without the guilt.
Do you love to read in bed at night?
Have you ever read a book and then wished you had an electronic reading device to help keep you entertained? Well now you can with the right dry herb vaporizer. You can get a pen style vaporizer that has a warming element so that you can puff it while you lie in bed getting a good night’s sleep.
Lots of people don’t realize that you can save money by using an electronic cigarette instead of a regular one. Electronic cigarettes are basically similar to the old style ones that smokers used to light up. The only difference is that these units do not produce smoke. All you have to do is heat up the electronic cigarette and you get a nice vapor.
A lot of people who use electronic cigarettes don’t realize that you can buy them in different shapes and sizes.
You can get a larger pen style vaporizer that has a warming element for better flavor. If you’re not into the whole pen thing then you can also get a smaller version for your key chain. They also come in different colors and styles. This way you can personalize your vaporizer and make it uniquely yours.
These reasons are great but there are even more. One reason that you might find interesting is the anti-oxidant qualities of e-cigs. Most of the time when you’re trying to quit smoking you want to stay healthy. With an electronic cigarette you don’t have to worry about this at all. Since the e-cigs don’t release any smoke they are considered to be healthier than any kind of tobacco you can find in cigarettes.
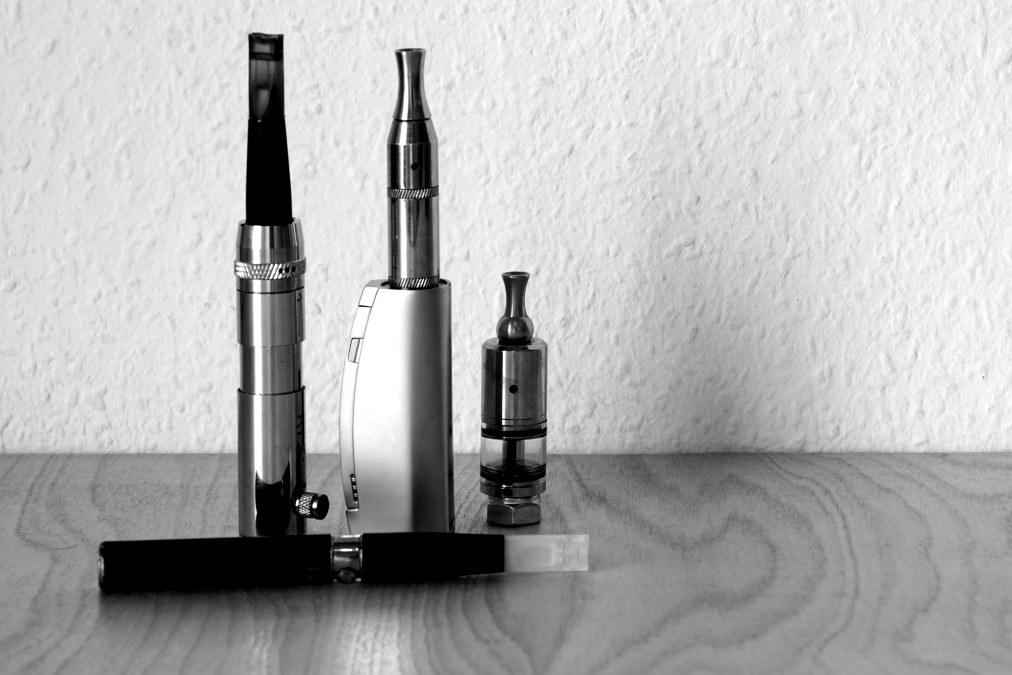
https://liftvaporblog.com/wp-content/uploads/sites/13/2020/12/young-male-adult-holding-and-using-a-vaping-device_t20_lR6VR2.jpg7189572020-12-14 08:26:172020-12-14 08:26:179 Reasons To Vape
A clean vaporizer is the easiest way to get optimal performance.
Although the ingredients in the liquid generally won’t stain your kit, residue will build up and build-up will eventually affect the performance of you vape. Vegetable glycerin and some darker liquid flavorings are known to ruin strengths, as are most of the sweeteners used in making liquids. A saturated coil will have less flavor and vapor production and will make vaping taste burnt.
Even if you change the resistance, the taste of your last liquid may still remain on your device.
This is especially true for tobacco, coffee, menthol, cinnamon, and other dominant flavors like melon, grape, or licorice. Imagine trying to vape a grape flavored coffee liquid, no offense to grape coffee lovers.
What if your vaper is new?
Sometimes atomizers and tanks arrive smelling of machine oil. They may not look dirty, but the distinctive smell will give them away. Whether your device is new or heavily used, proper cleaning is an easy way to ensure the best possible experience. Fortunately, most tanks these days are easy to clean if you know the correct steps to take.
Cleaning your atomizer
vape parts
Step One: Take out the resistor (we’ll discuss the resistor cleaning later). And while you’re at it, take the rest of the tank apart. Pay close attention to how things fit together and make a mental note of what is going and where. Keep everything organized and don’t lose any pieces. You can use a small bowl to store everything while you do this. This will make cleaning much more efficient, while also familiarizing yourself with the elements in your tank. There are many ways to clean your vaporizer tank, but these are the most effective.
Standard cleaning
If your tank is relatively clean, warm water works well. Disassemble the tank, separating the parts. Place each part under running water and pat dry with a paper towel. Let them air dry afterwards until no water or condensation is visible.
Take one and fill it with water. Put it in the microwave for about two minutes. Meanwhile, rinse the parts of your tank under the sink to begin the process. Then, take the mug or bowl out of the microwave and place your disassembled tank inside it.
Let it sit, until the water cools, then rinse the tank one last time under the sink. Use a paper towel to gently and carefully dry your tank. Set it aside until completely dry. You can also use a hair dryer to speed up the process, but too much heat can damage your O-rings.
The intense cleaning
If you want even better results, you can use a few simple household items to give your tank a deeper clean. Be careful to rinse them well after application and let your tank dry.
The sodium bicarbonate is a good cleaning agent that can be used for tanks shine again.
The ethanol, also known as grain alcohol, is another very effective substance for cleaning. Don’t confuse this with rubbing alcohol, which shouldn’t be used inside your tank.
The vinegar is very acidic cleaning agent, but should be rinsed well to prevent further smell.
The vodka cheap is not a household item, but you ‘ll probably find it in the supermarket. It will get the job done and it won’t cost you much.
Some vapers prefer to use a little dish soap or lemon juice with water. Again, remember to rinse well, as vaping dish soap is probably worse than it sounds.
Ultrasonic cleaning
If you want the most thorough cleaning possible for your vaporizer tanks, you will need an ultrasonic cleaner. Typically used to clean jewelry and precious metals, it is now used by vapers around the world to clean their atomizers. While you don’t need an ultrasonic cleaner made specifically for vaping equipment, having one that can run for cycles longer than ten minutes will help.
Using an ultrasonic cleaner is not a complicated process. Just fill it with water and use it until you clean the vaporizer tank parts. For best results, you can add a couple of drops of dishwashing liquid to your ultrasonic cleaner. Then you rinse the tank more and let it dry.
Cleaning the resistors
Heating element cleaning is a bit less straightforward. There are two types of heating elements: conventional tank heating elements, which are enclosed in a small metal chamber containing absorbent cotton; and serviceable resistors, which require the user to install and assemble them. The approach to cleaning the two types is very different.
Conventional resistors
Conventional resistors that come with sub ohm tanks and clearomizers can be technically cleaned, but will not fully reactivate. At best, you get a few more days of conventional resistance. The reason behind that is the presence of cotton. Allowing dirty coils to soak and allow water to pass through will remove some of the residue, but not all. And on top of that, you’ll have to wait for the water to completely evaporate, which can take a while.
If you still want to clean the coil heads, you can follow the old soak and rinse method.
Let your resistance soak in cheap ethanol, vinegar, or vodka for at least a couple of hours
Place it under the tap and rinse.
Rinse once more with a little distilled water.
Blow air into the open side of your coil to force the water out
Let it dry until all the water has evaporated.
A little sun or a heater will speed up the process, but it will still take time. You’ll notice that the cottons will look a lot better after that, but again, don’t get too hopeful. You will still need to change the resistor soon despite how new it will look.
Repairable resistors
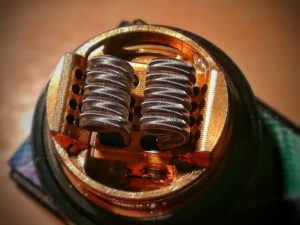
vape coil
If you are using a repairable atomizer, you can not only clean your coils, but you actually have to clean them! The armored heating elements will begin to suffer rapidly in flavor and vapor production. But you can follow a few simple steps and have your resistors almost as good as new in no time.
The first thing you have to do is remove the cottons from your heating elements, you don’t want to burn them. If your resistances are not that bad, a slight “dry burn” will suffice. Press the fire button a few times until the remaining liquid is removed, let them cool, and reassemble.
But if you’ve already done it a couple of times, dry burning may not be the trick. In that case, you can follow these steps for a more thorough cleaning.
Remove the cotton
Dry burn your heating elements lightly (don’t let them shine too bright)
Remove the atomizer from your mod
Place it under running water
Brush them lightly with a toothbrush or resistor cleaning tool
Rinse one more time
Finish with a last dry burn to remove the last drops of water.
You can also use a little dishwashing liquid when brushing your heating elements, but be careful to rinse them well afterwards with hot water.
If your coils are still very dirty, or if flavor production has dropped significantly, then it is time to reset your atomizer. Proper cleaning will greatly extend the life of your resistors, but at some point, they will succumb to time and extensive use.
Ultrasonic cleaning
If you want the most thorough cleaning possible for your vaporizer tanks, you will need an ultrasonic cleaner. Typically used to clean jewelry and precious metals, it is now used by vapers around the world to clean their atomizers. While you don’t need an ultrasonic cleaner made specifically for vaping equipment, having one that can run for cycles longer than ten minutes will help.
Using an ultrasonic cleaner is not a complicated process. Just fill it with water and use it until you clean the vaporizer tank parts. For best results, you can add a couple of drops of dishwashing liquid to your ultrasonic cleaner. Then you rinse the tank more and let it dry.
Cleaning the resistors
Heating element cleaning is a bit less straightforward. There are two types of heating elements: conventional tank heating elements, which are enclosed in a small metal chamber containing absorbent cotton; and serviceable resistors, which require the user to install and assemble them. The approach to cleaning the two types is very different.
Conventional resistors
vape coil 2
Conventional resistors that come with sub ohm tanks and clearomizers can be technically cleaned, but will not fully reactivate. At best, you get a few more days of conventional resistance. The reason behind that is the presence of cotton.
Allowing dirty coils to soak and allow water to pass through will remove some of the residue, but not all. And on top of that, you’ll have to wait for the water to completely evaporate, which can take a while.
If you still want to clean the coil heads, you can follow the old soak and rinse method.
Let your resistance soak in cheap ethanol, vinegar, or vodka for at least a couple of hours
Place it under the tap and rinse.
Rinse once more with a little distilled water.
Blow air into the open side of your coil to force the water out
Let it dry until all the water has evaporated.
A little sun or a heater will speed up the process, but it will still take time. You’ll notice that the cottons will look a lot better after that, but again, don’t get too hopeful. You will still need to change the resistor soon despite how new it will look.
Repairable resistors
If you are using a repairable atomizer, you can not only clean your coils, but you actually have to clean them! The armored heating elements will begin to suffer rapidly in flavor and vapor production. But you can follow a few simple steps and have your resistors almost as good as new in no time.
The first thing you have to do is remove the cottons from your heating elements, you don’t want to burn them. If your resistances are not that bad, a slight “dry burn” will suffice. Press the fire button a few times until the remaining liquid is removed, let them cool, and reassemble.
But if you’ve already done it a couple of times, dry burning may not be the trick. In that case, you can follow these steps for a more thorough cleaning.
Remove the cotton
Dry burn your heating elements lightly (don’t let them shine too bright)
Remove the atomizer from your mod
Place it under running water
Brush them lightly with a toothbrush or resistor cleaning tool
Rinse one more time
Finish with a last dry burn to remove the last drops of water.
You can also use a little dishwashing liquid when brushing your heating elements, but be careful to rinse them well afterwards with hot water.
If your coils are still very dirty, or if flavor production has dropped significantly, then it is time to reset your atomizer. Proper cleaning will greatly extend the life of your resistors, but at some point, they will succumb to time and extensive use.
https://liftvaporblog.com/wp-content/uploads/sites/13/2020/12/vape-parts.jpg7189572020-12-14 08:20:262020-12-14 08:20:26How to clean your atomizers and resistors
An herb grinder is an essential tool for the modern stoner who can grind his flowers to either roll them, grab a bong, load a hand pipe, or anything in between. Herb mills are often made up of several parts and contain multiple chambers and work by crushing and cutting your herb into smaller pieces. Choosing a good grinder will save you the tedious and sticky process of hand-picking herbs.
Grinders not only make your life easier; they also give you more momentum for your buds.
The best herb grinder should give you a smooth grind, meaning it systematically and constantly cuts your weeds into small, even pieces. The most common type of sanding is the multi-piece sander, which uses multiple pieces that are joined together to create an area for sanding and storage.
WHAT IS AN HERB GRINDER?
Well, it’s a tiny device that makes a cannabis user’s life many times more convenient. Basically, it chops up your herb efficiently and creates (or at least it should) create an even grind. Of course, not all grinders are created equal. Some are manual while others are electric.
Some are duds while others charge you top pounds. The list goes on. So, if you have a really good weed killer (read this: the best) on the market then you should know exactly what to look for. The guide listed here will give you an in-depth look at the characteristics of the best grinders so you can be sure of getting the most out of your bud at all times.
Types of herb grinders
Herbal mills can have two, three, four parts depending on your preferred style. Consumers can choose between a 2-part grinder, 3-part grinder and 4-part grinder.
2-part meat grinder
A 2-part grinder only has one compartment for herbs. It can grind and store your cannabis. Since it is relatively cheaper than regular grinders, users have complained that it produces inconsistent sizes of herbs. People on a budget should preferably get this grinder as it offers convenience at a lower price.
3-part grinder
A 3-part grinder has two compartments for herbs. The connection between the two compartments is made possible by holes in the lower part of the top layer that lead into the second compartment.
The holes can only accommodate certain sizes of herbs, so that the first chamber has a larger surface. In contrast to the two-part version, consumers can look forward to evenly ground herbs from the three-part grinder. Users can also easily take their herbs from the second compartment.
4-part grinder
A 4-part grinder has three compartments for herbs. The third and second layers are connected by a single mesh screen. The third compartment, also known as the pollen catcher, is for storing kief. The pollen catcher can store all the fine particles that fall from the 2-part and 3-part chambers. Four-part grinders can grind all types of herbs including cannabis.
ELECTRIC GRINDER
Electric grinders are extremely handy as they do all the hard work for you. The biggest downside is that they have to be powered somehow. If the grinder is not operated with batteries or accumulators, you will need a power outlet. Also, electric grinders tend to overdo it and may pulverize your weed.
Because of these drawbacks, electric models are not that popular among consumers. Unless you need to grind a large amount of buds as fast as possible, you might be better off using a manual grinder.
How do you clean weed grinder?
You’d think there’s nothing wrong with cleaning an herb grinder. You are very wrong. It’s in the nature of the animal that things can get pretty sticky, and pretty quickly. In this way you can ensure that your herb grinder is always up to date and smells of roses.
Empty the grinder completely (preferably on a sheet of paper if it contains everything you need at this point).
Put all of the pieces in the freezer. The cold solidifies the residue and makes it easier to dissolve.
Use a small toothbrush to clean the inside of the compartment as well as the braid. Be careful not to scrub too vigorously or you could damage the fabric.
Use a toothpick to remove the clumped debris from those little nooks and crannies.
If the grinder is still not clean enough, soak it in boiling water for 10 minutes (only if the grinder is made entirely of metal, of course). Repeat the process with the toothbrush.
If all else fails, try some rubbing alcohol. Use a soaked Q-tip to clean the teeth and the inside of the compartments.
Rinse and wipe the pieces off. Let them sit on a paper towel until completely dry.
Buying guide for the best herb grinder
Before making a final decision, review this list of key points:
Material
When we talk about the materials of the grinder, we are talking about the exterior or the actual body. This does not include the teeth. We’ll discuss that later. For the body of the grinder, here are the most common materials that you can find on the market.
Wood: This type of herb grinder is difficult to mass-produce, which explains why it’s an expensive choice. It is made by hand. Unfortunately, it’s also hard to find. This is a great choice if you prefer organic materials. Most wood grinders only have a single compartment, however.
Metal: When it comes to metal grinders, there are two common materials – aluminum and titanium. Aluminum is the more popular choice, which is often titanium coated. You may have read some claims that aluminum grinders are unsafe. The truth is that they are safe and you don’t have to worry.
Acrylic: Of the materials used in a weed killer, this is the cheapest. However, it is also the least durable. They can decompose easily compared to the two materials mentioned above.
size
A large herb grinder is best because you can store large amounts of ground herbs. However, size has a huge impact on portability. If you plan to use the herb on the go, consider buying a small grinder, while if you are going to be using the herb primarily at home, consider buying a large grinder. In addition, if you are going to use the herb for medicinal purposes, buy a large meat grinder that has a cheap capacity.
Kief catchers
If you are going to buy a grinder out there, it would be wise to buy one that has kief catching capabilities. Look out for a four-chamber grinder because it is always of the best quality. That way, you can be sure that she has this trait as it is usually the first from the bottom. This property is important because it allows you to collect the soft powder known as kief. The powder is high in THC, which when you add cannabis to it, gives you an extra kick.
Magnetic lid
Most herb grinders come with a magnetic lid that helps keep the grinder airtight so your herbs stay fresh and odor-free. With an herb grinder with an airtight lid, you can be sure nothing will spill. Using an herb like marijuana will keep your privacy safe as the smell won’t come out. Most grinders with magnetic lids are a bit expensive, however. In fact, this point is heavily considered when buying a grinder.
Storage container
Another feature to look out for is the memory capabilities of the grinder. This is important because you don’t have to buy a separate storage container for your cannabis. Make sure that the lid is also magnetic as it is airtight so that no odor can escape from the grinder and your privacy is preserved. Plus, a grinder with an annual limited warranty will be a huge asset to your decision, and you won’t have to worry.
Benefit of using grinder
Quite simply, if you use the grinder to grind your weed before smoking or vaping, it will be much easier to use. You will also find that this makes it easier to transport and more pleasant to consume.
Crushed grass tends to be less scratchy because it is much more uniform in consistency. Unlike whole buds, the shape of which can affect the nature of the smoke, shredded weed burns cleanly and evenly. In terms of joint building, this means you can roll firm, perfect joints that burn effectively. In a bong you can use ground weed to create a flood head or heads that just keep burning and avoid unpredictable draws.
In addition, grinding your weed will not come into contact with your hands as often. This protects the trichomes and the valuable cannabinoids they contain from damage. Using a grinder will maintain the quality and potency of your buds. Instead of losing trichomes, they are collected in a quality grinder for use at a later date.
https://liftvaporblog.com/wp-content/uploads/sites/13/2020/12/rocket_exp_last_400x.png2334002020-12-14 08:13:352020-12-14 08:13:35EVERYTHING YOU NEED TO KNOW ABOUT HERB GRINDERS
Lift Vapor-Quitting smoking is now easier than ever!
Have you been wanting to quit smoking for some time and just haven’t been able to find the perfect product to help make it easier? Have you had the desire to improve your health and use the money you have been wasting on cigarettes towards something more important? If all of that applies to you then Lift Vapor is the solution to your worries!
Lift Vapor is an electronic cigarette that looks, feels, and tastes like a REAL cigarette! If you have been trying for years to quit smoking or have thought about it over and over again but can’t seem to commit to doing so then this is the absolute best option out there for you today. Remember with e-cigs there are NO more restrictions. You will now have the freedom to smoke wherever you like such as at your office at work, at restaurants, bars, etc! This amazing electronic cigarette, it will give you the same look, feel, and nicotine that you are used to with your current tobacco cigarettes. Included with your free kit are everything that you need to get started such as rechargeable batteries, cartridges, USB charger, and wall adapter. One fully charged e-cig will last you the equivalent of about one full pack of cigarettes! With this particular e-cig starter kit, you are sure to save tons of money versus what the competitors charge making it a no-brainer and the logical choice in your quest to quit smoking. Make today the day you take that important first step in your life to quit smoking! Don’t you think it’s time to experiences all of these amazing benefits for yourself?
Benefits of Lift Vapor include:
Smoke almost anywhere!
No more second hand smoke to breathe in
Save lots of money versus buying tobacco
No more bad breath and yellow teeth
No smell, tar, or tobacco!
If you are ready to finally quit smoking then why not right now? It’s not easy to quit cold turkey but this incredible e-cig product, it will make the transition almost seamless! Imagine how much money you will save each month in addition to how much healthier and renewed you will feel! Quit now and you will prevent potential further damage to your body in addition to putting more money back into your pocket. It’s a win-win situation that you can’t pass up!